Parts:
- Adafruit chassis ($25, small and slow) or larger robot car chassis ($12, faster and better ground clearance — recommended)
- RasPi Robot motor controller
- (Only for Adafruit chassis) 7.4v LiPo battery (any capacity will work, but I find that 1600-1800 mAh gives plenty of duration) and charger
- Some jumper wires
- Some 1/32″ sheet aluminum (hardware store or Amazon)
- RasberrryPi 3 + camera
- FormulaPi code (requires signup for FormulaPi to get access)
- A DIY track made with tape
Total: $75-$100
Instructions:
This reference platform improves on the basic FormulaPi model in three ways:
- Uses easily available chassis and motor driver boards
- Uses a RaspberryPi 3, which has WiFI built-in and enough computing power to allow use of VNC remote access to monitor progress without slowing to a crawl.
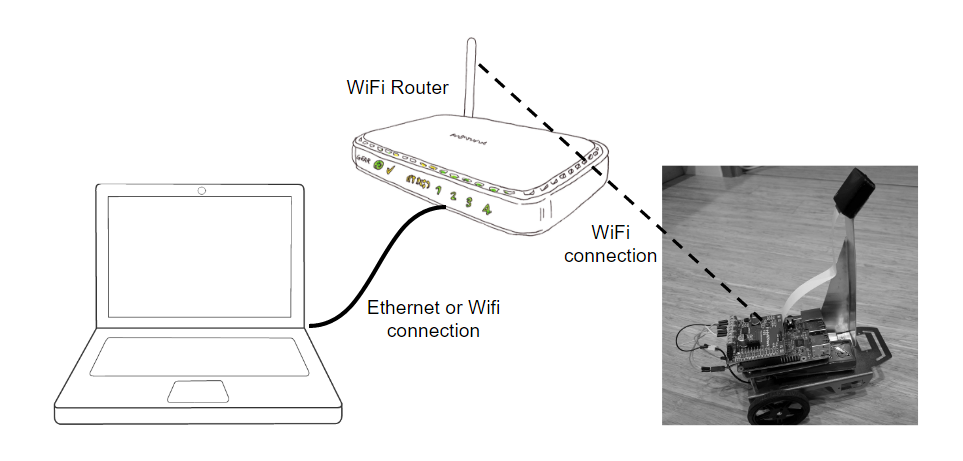
- Uses a cloud robotics model to do most processing on a laptop by streaming the video and commands over WiFI (see diagram below):
The Adafruit chassis…

Or the generic one from Amazon…
Hardware:
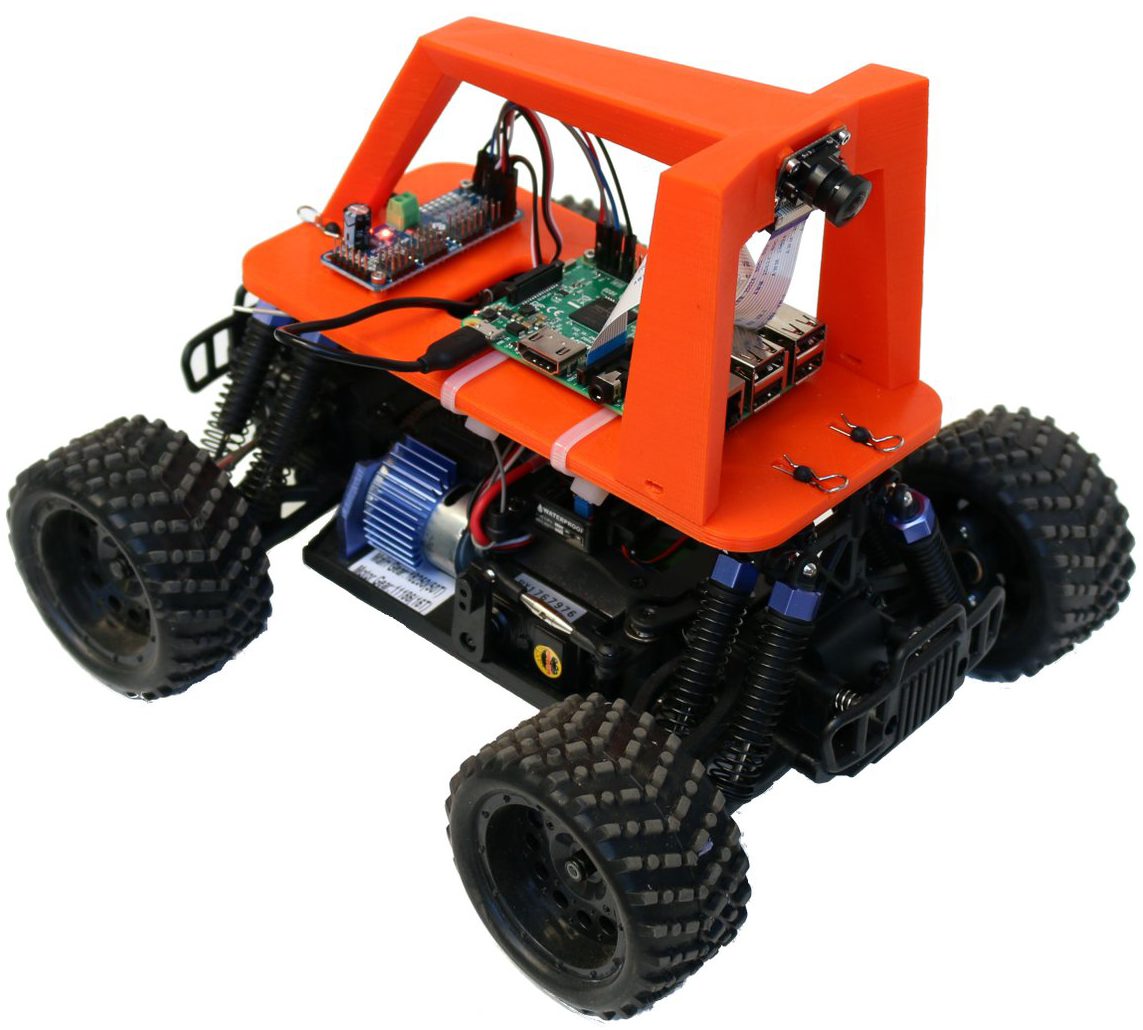
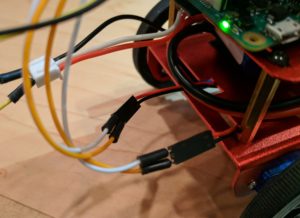
1: Assemble the chassis and mount the RaspberryPi and motor controller with velcro tape as shown in photo at top of page.
2: Use two jumper wires to connect the battery charging connector to the the motor driver’s power input, as shown below (yellow and black wire). The battery’s black wire is the ground; the red wire is the 7.4v one.
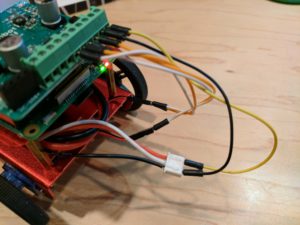
3: Use jumper wires to connect the motors to the motor controller board as shown. The terminal on the motor driver board marked “L” goes to the left motor, “R” goes to the right motor. Make sure you get the polarity right (in this case I have a white wire going to the motor’s red wire, and the orange to the red); otherwise the motors will run backwards.

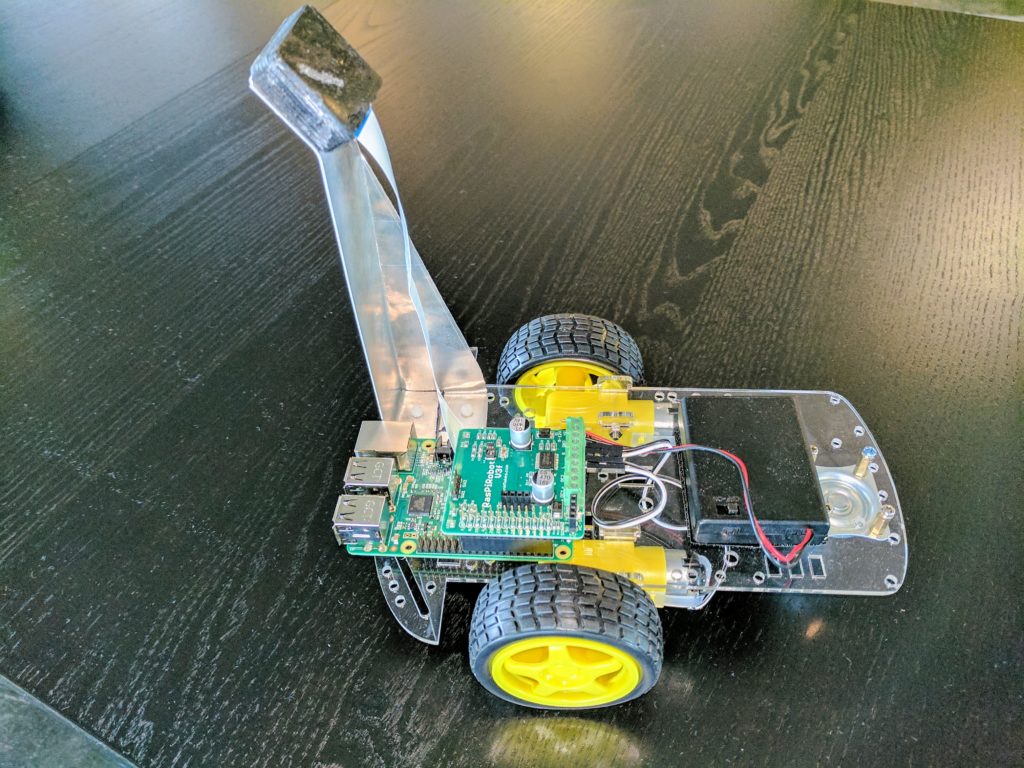
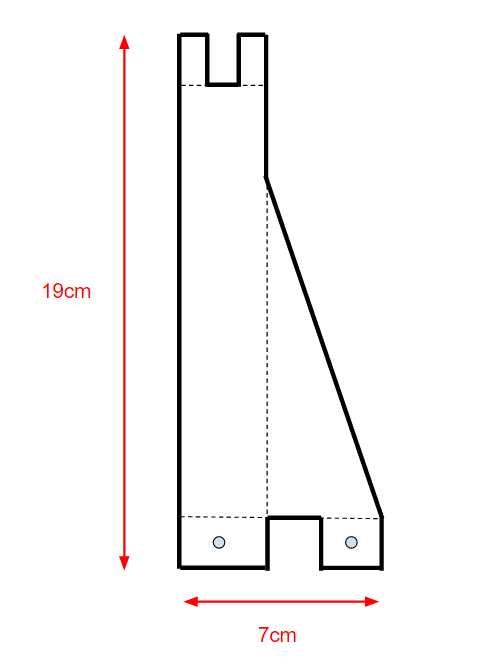
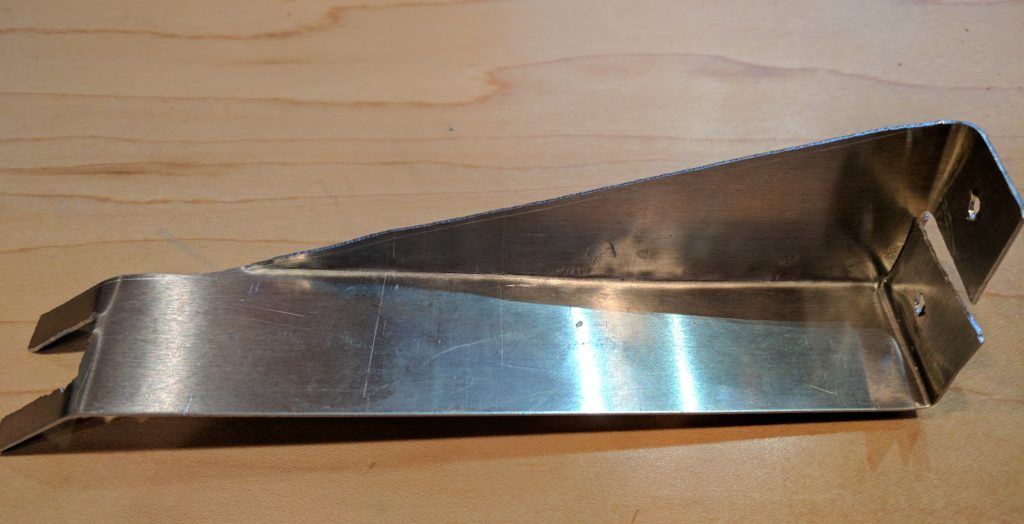
4: Cut out aluminum according the template below (the exact shape doesn’t matter, but these are the rough dimensions I use). Fold on the dotted lines. Final shape should be as shown in photo below. Place it on the chassis and drill holes where they line up with existing bolts for the pivoting wheel at the front of the chassis. Fasten it with those bolts and attach the camera on the top. You can screw the camera board into the aluminum directly, or 3D print a case and superglue that on (which is what I’ve done in these pictures).
Software:
On the RaspberryPi
Download a pre-built image…
I’ve created a disk image that has this all set up already, so if you want to do the easy way, just download this and use your favorite disk imager (I use Rufus) to write it to a blank 32GB micro SD card. If you do this, you can jump down to the “On your laptop” section below.
…or do it step-by-step:
First, set up your RaspberryPi with the following settings (use “sudo raspi-config” from a command line to change them):
- Camera enabled
- SSH enabled
- VNC enabled
- Automatically connects to the WiFi router you’re going to use for this setup
Now install some required packages:
Video streaming
- Install MJPG Streamer on to your RaspberryPi by following these instructions
- Once it’s installed, open a terminal in the MJEG folder (that’s probably “/usr/src/mjpg-streamer/mjpg-streamer/mjpg-streamer-experimental”) and enter the following command (leave the terminal open when you’re done so it keeps running in the background) :
./mjpg_streamer -o "output_http.so -w ./www" -i "input_raspicam.so -x 640 -y 480 -fps 20 -ex night"
Once it’s running, it should show something like the following:
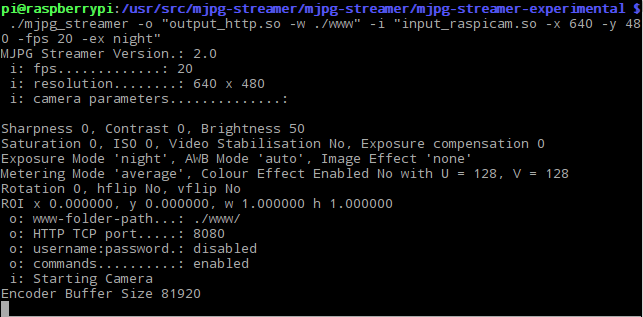
You can test that this is working by running stream.py on your laptop as descibed in the software section below.
Motor controller board libraries
Full instructions are here, but all you need to do is enter the following commands in a RaspberryPi terminal when it’s connected to the Internet:
$ cd ~

$ git clone https://github.com/simonmonk/raspirobotboard3.git

$ cd raspirobotboard3/python

$ sudo python setup.py install
On your laptop (Windows, Mac or Linux)
1: Ensure you’re running Python 3.x. Instructions to download and install it are here.
2: Install OpenCV 3.x. Instructions to download and install it are here.
3: (Optional) Install a VNC viewer. Instructions to download and install it are here.
4: Install modified FormulaPi code
- Register for FormulaPi. You must do this — the code is only allowed to be distributed to registrants.
- Download or clone the modified FormulaPi code from this Github repository
- Copy rover.py and killmotors.py to your RaspberryPi (you’ll probably want to create a folder for them, such as “FormulaPi”)
- The other files will stay on your laptop.
Some key files are these (you can read more about each one here and more about the theory behind them in the FormulaPi blog here, which is best read from the beginning)
- SimulationStream: This is a modification of the stock FormualPi Simulation code, but rather than running a simulation we’ll be running the real car remotely over Wifi. It’s the “server” that sends motor commands to the “client” script (Rover.py, see below) running on the RaspberryPi
- Settings: This is the file of useful settings that you’ll be using to tune your rover. One of the cool things about it as that you can change settings while it’s running, and when you save the file the new settings will take effect
- ImageProcessor: this is the code that does all the OpenCV image processing work.
- Rover: This is the “client” code that runs on the RaspberryPi. It just listens for motor commands over Wifi and sends them to the motor controller board
- Race: This is the script that commands higher level racing tactics. The basic one includes just says “go and follow your lane” but you can add much fancier instructions in more complicated scripts, as suggested by these examples. Instructions and tips are here.
- killmotors: If you find yourself having to control-c kill your code and the rover’s motors are still running, close the Python interpreter on the RasPi and run this script, which will stop the motors.
- Stream: If you want to test your video stream, run MJPEG streamer as described below on the RasPi, then run stream.py on your laptop. It should show you live video from your rover. Note that you will probably have to change the hard-coded IP address in the code to that of your RasPi, as descibed in the next section.
5: Configure the code for your IP addresses
First, find the IP addresses of your laptop and RaspberryPi. If you’re using a WiFi router that’s not part of another network (ie, just creating its own network, which is the recommended approach), your laptop’s IP address is probably something like 192.168.1.1 (on Windows, open a command line and type “ipconfig” to find your address) and your RapberryPi is probably something like 192.168.1.3 (to find out, type “ip addr show” at the command line or if you’ve got a desktop, just hover your mouse over the WiFi icon at the top right of the screen)
Then you need to edit the client and server code to hard-code these addresses.
On the server (your laptop), edit this line in SimulationStream.py to change the IP address of your RasPi :
stream=urllib.urlopen('http://192.168.1.3:8080/?action=stream') #Change to the IP address of your Raspberry Pi.
On the client (the RasPi), edit this line in rover.py to reflect the IP address of your laptop:
host = '192.168.1.1' # Change this to the IP address of the PC you're communicating with
If for any reason when you run the code, you get a complaint about ports being already in use and unavailable, you can also change the port numbers to anything you want (they happen to default to 12348). Just make sure that you use the same port number in the client as you do in the server.
Usage instructions
I typically VNC into the RasPi to remotely control it from my laptop using the traditional desktop, but if you want to save some cycles you can SSH into a command line instead. There is no pictorial output from the client code, so either method (VNC or SSH) will work fine.
Once you have connected to the RasPi, there are three steps to run, which should be done in this order:
- Run the MJPG Streamer as described in the video streaming section above
- Start the server code on your laptop (run “SimulationStream.py”)
- Start the client code on the RasPi (run “rover.py”)
Once it connects, the rover will begin moving slowly, staying within the track, and processed images will be displayed and stored on your laptop. You can stop it at any time by pressing Control-C in the Python interpreter window. If that doesn’t stop the motors, close the interpreter on the RasPi side, too.
Obviously, there is much you can do to improve this, such as:
- Go faster: the default power setting is very low (“simulationDrivePower = 0.3″ in the Settings.py file). Try higher figures, such as 0.4 or 0.6
- Go straighter: it’s a bit snakey now. Trying tweaking the PID gains to make it drive straighter
- Go smarter: add some logic to drive like a real racing car, using the inside lane on curves.
- Try different software approaches: Since the car is just streaming video to the laptop (so the car just looks like a camera to the code) and your laptop presumably has plenty of processing power, you can use any software you want, from your own to the full TensorFlow/CNN stack taught in the Udacity Self Driving Car nanodegree. Try some of the other open source software projects listed here.
Hey! I’m more an arduino maker, i have a raspPi but didn’t have much time to get to play with it yet. But i wanted to thank the effort you put in bringing all the knowledge you have closer to the people. This whole page is a great work , really appreciate it! Thanks from Argentina! Benja
Why do you plug into the battery charging wires
Because that’s where regular wires, which is what I use for the terminals on the motor controller, can fit in snuggly. I’d have to solder a connector if I plugged into the main battery connector. The voltage from the battery charging connector is the same as the main connector.
Hi all,
Thanks for posting all these details.
I am just getting started with building one of these platforms.
In addition to the donkey library, I would like to use a more powerful computer(say an Intel NUC or maybe a smart-phone that can run Linux) and ROS to do control and more autonomous behaviors.
Has anyone tried building a setup like that? I have experience with ROS but not much experience with interfacing hardware. Suggestions will be much appreciated
Hy , nice tutorials appreciated big time.
Just a couple of questions, can you give directions on how to use and H-Bridge instead of the Rasbpi motor driver.
hi, for the Motor controller or the 2 motors, we don’t need a separate battery pack? I thought they may draw too much current. Thanks